Stage 1 tasks: Set up (once)
Each task stands on its own. It says when it happens in the year, how long it takes, what you need, and what comes next. Where a task has a clip, the clip and the steps tell the same story. Where a step cannot be undone, a warning comes before it and a line after it says what to do if it was a mistake.
On this page
- Check the departments and their manpower bands
- Add a department
- Add a hospital, or change its cluster
- Check the Curriculum
- Add residents
- Add residents' past years
- Put the running year in through a draft
- Check every resident's year group
- Change a resident's details
- Remove a resident added by mistake
- Add a colleague to the planner
Check the departments and their manpower bands
When: at set-up, then whenever a department's places change. About 10 minutes. You need: each department's least and most residents per block, and the posting lengths it takes.
Each department's band, one band changed and saved, then the Curriculum (26 s)
Before you start: a department has one band for the whole year. For part of a year, add a band rule to a draft instead (see Add a rule of your own).
- On Home, press Departments. The page shows two closed lists, Hospitals and Departments, each with its count.
- Press Departments. The departments open, grouped by hospital. Each shows its specialty, its band, such as Manpower: 5 to 6, and its lengths, such as Duration: 1 to 3 blocks.
- Press a department. Its sheet opens, titled, for example, Cardiology at NHC.
Warning: a draft you have already made keeps the bands it was made with. After a change here it shows the line Residents / Curriculum / Department data changed since this draft was made. Press Duplicate on that draft to take the change.
- Type the Min manpower and Max manpower: the least and the most residents in any block, as whole numbers.
- Under Duration, pick each posting length it takes: 1, 2 or 3 blocks. You can pick more than one.
- Press Save. The line Saved Cardiology at NHC. shows under its tile.
If this goes wrong: the sheet says what to fix, such as Min manpower is above max manpower., Min and max manpower are whole numbers. or Pick a duration. Fix it and press Save again.
More detail
- The planner starts with 9 hospitals and 36 departments, read from three past rotation plans. Each band is the smallest and largest number of R1, R2 and R3 residents seen there, block by block. Check each one against today's numbers.
- Manpower: 6 means the least and the most are both 6.
- To remove a department, open its sheet, press Remove, then Tap again to remove. If it was the last department of a specialty the Curriculum asks for, the Curriculum shows no department under that row.
- The seventeen specialties are fixed, and you cannot add one (see The specialties and their codes).
- The planner never places more or fewer residents than a band allows. Only boxes you place by hand can break a band.
Next: Add a department, or Check the Curriculum. Try it in the demo: change one band and save it. The demo's bands are a sixth of the real ones.
Add a department
When: at set-up, or when a department starts taking residents. About 3 minutes for one, 10 for a paste. You need: the specialty, the hospital, the band and the posting lengths.
Before you start: the hospital must be on the list. If it is not, add it first (see Add a hospital, or change its cluster).
One department
- On Departments, press Add department. The sheet Add department opens.
- Pick the Specialty and the Hospital. Only pairs not yet on the list are offered.
- Type the Min manpower and Max manpower, and pick the Duration lengths.
- Press Add. The line reads, for example, Added Rheumatology at SKH.
Many departments, by paste
Warning: a paste only adds new departments. A department already on the list reads Already on the list and is left as it is. Change its band in its own sheet.
- On Departments, press Paste departments.
- Press Download the template. The file departments-template.csv downloads, with an example row and the specialty codes.
- In your spreadsheet, fill in one row per department: Specialty, Hospital, Min manpower, Max manpower and Duration.
- Copy the rows and paste them into the box.
- Read the count line, such as 5 rows: 3 to add, 1 already on the list, 1 left out. Each row left out says why.
- Press the button that adds them. It says how many, for example Add these 3 departments. The line then reads Added 3 departments.
If this goes wrong: a row naming a hospital that is not on the list asks you to add it under Hospitals first. Other rows left out say, for example, Cannot be read: not one of the specialties, Cannot be read: manpower not a whole number or Cannot be read: duration not 1, 2 or 3.
More detail
- The paste reads rows copied from a spreadsheet, or the template file's commas. A heading row is skipped.
- Write the specialty as its code or its name, and the hospital as its code.
- Write the Duration as
1 3,1, 3,1-3or1 to 3. A blank Duration means 1 block, a blank Min means 0 and a blank Max means 1. - A draft made earlier does not offer a new department: its box sheet, Paint and rule pickers offer only the departments it was made with. Press Duplicate on that draft, and use the duplicate.
Next: Add a hospital, or change its cluster. Try it in the demo: add a department, then remove it.
Add a hospital, or change its cluster
When: rarely: when postings start at a new hospital, or a hospital changes cluster. About 2 minutes. You need: the hospital's short code, and whether it is in your home cluster.
Before you start: a hospital cannot be renamed later. Its name is its short code, such as SGH.
- On Departments, press Hospitals. The list opens, home cluster first.
- Press Add hospital.
- In Hospital name, type the hospital's short code, in letters and numbers only.
- Pick Home cluster or Cross-cluster.
- Press Add. A line says the hospital was added.
To change a hospital's cluster
- Under Hospitals, press the hospital's tile. Its sheet opens, titled with its code.
- Pick Home cluster or Cross-cluster.
- Press Save. A line says it was saved.
The change counts from today's block. Postings already done keep the cluster their hospital had at the time.
If this goes wrong: That hospital is already on the list., or Use letters and numbers only, like SGH.
More detail
- The planner starts with 9 hospitals: 7 in the home cluster, among them SGH, SKH, KKH, NHC, NNI and NCC, and NUH and NHG in the cross-cluster.
- One DIM block must be at a cross-cluster hospital, best done in R2 (see The built-in rules).
- To remove a hospital, press Remove, then Tap again to remove. It stays while anything names it: a department, the Database, a draft or a wish. The sheet says which, for example SGH has departments, so it stays; remove its departments first.
Next: Check the Curriculum.
Check the Curriculum
When: at set-up, then only when the programme's requirements change. About 5 minutes. You need: the programme's requirements by year group.
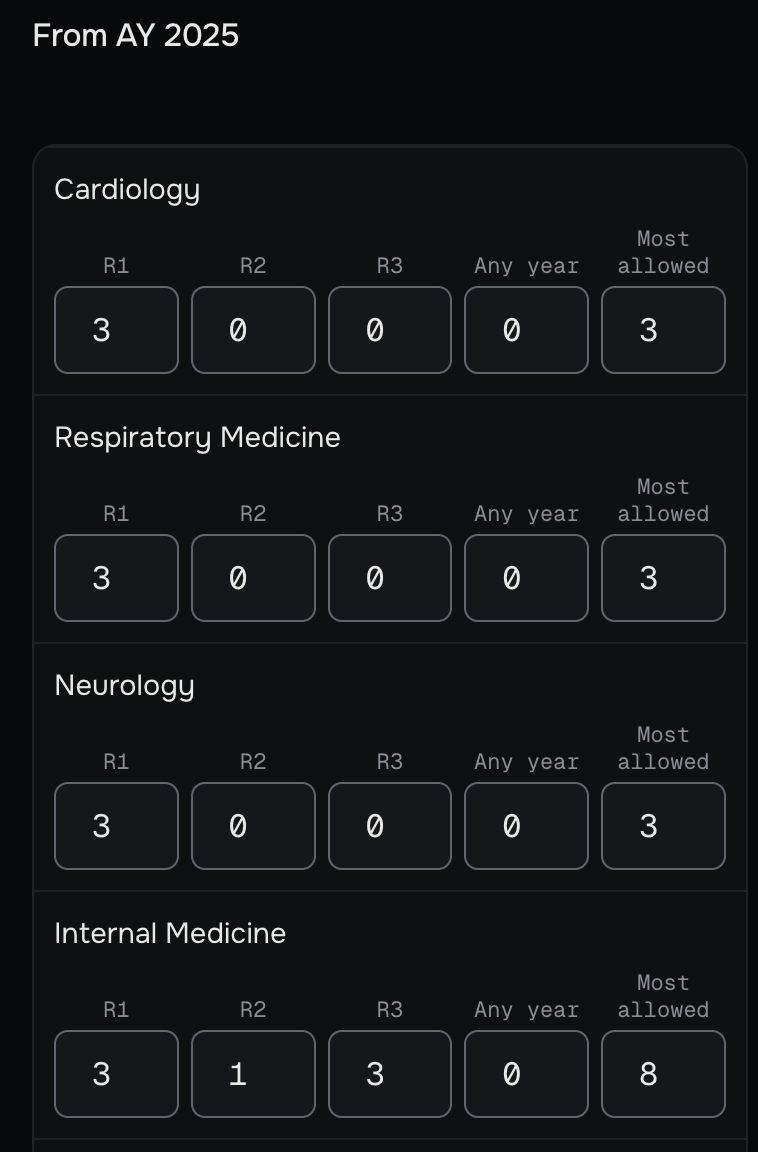
The Curriculum says how many blocks of each specialty a resident must do, by year group. It is kept in versions by intake year. Each resident follows the version for their admission cohort for their whole residency.
- On Home, press Curriculum. The newest version is open, headed From AY 2025. Older versions are folded, such as Before AY 2025.
- Read each row's five numbers: R1, R2, R3, Any year and Most allowed.
- Press an older version's heading to open it, and check it the same way.
Warning: a changed number counts from today's block, for every resident who follows that version. Change a number only to fix a mistake. A real change of requirements for a new intake needs a new version.
- To fix a mistake, type the right number in its box and leave the box. Saved shows over the grid.
To add a version for a new intake
- Press Add a version. A sheet opens.
- In For residents admitted from, pick the first intake year it applies to.
- Press Add. The new version starts with the newest version's numbers. Change the ones that differ.
If this goes wrong: Whole numbers only, 0 or more. puts the old number back. That year already has a version. means that intake year has one already: change its numbers instead.
More detail
- Any year blocks may be done in any year of the residency. Most allowed is the most blocks of that specialty one resident may do over the whole residency.
- A specialty that is not on the grid may be done for up to 3 blocks.
- From AY 2025 the Curriculum asks for 27 compulsory blocks and 9 electives; before AY 2025, 28 and 8. The full numbers are in The Curriculum as it comes.
- If a version's compulsory blocks add up to more than 36, the grid warns, for example Adds up to 37 blocks, not 36.
- no department under a row means no department of that specialty is left.
- Remove this version, then Tap again to remove, appears only on the oldest version while no resident follows it. A removed version cannot be added back.
Next: Add residents.
Add residents
When: at set-up, and each year for the new intake. About 5 minutes by paste, or 1 minute a resident. You need: each resident's name and year group; their work email and admission cohort if you have them.
Add one resident, paste many, paste a past year, then see everyone by year group (29 s)
Before you start
- No two residents may share a name. The past postings paste finds residents by name.
- The work email is how a resident signs in, and where the wish emails go. A resident with no work email gets no email.
One at a time
- On Home, press Residents, then Add residents.
- Press Add resident. The sheet Add a resident opens.
- Type the Name and pick the Year group: R0, R1, R2 or R3.
- Optional: press More, then type the Work email and the Admission cohort: the year R1 began, as four digits.
- Press Add, or Add another to keep the sheet open for the next resident. The line reads, for example, Added Hodor Wylis as R1.
Many at once, by paste
- On Add residents, press Paste residents. The box opens with the line Admission cohort is the intake year; left blank, it is the year R1 began. An earlier year sets where R1 began, so every past posting from R1 can be pasted.
- Press Download the template. The file residents-template.csv downloads with its four columns: Name, Year group, Work email and Admission cohort.
- In your spreadsheet, fill in one row per resident. In Admission cohort, type the year their R1 began.
Warning: copy from the spreadsheet itself, in Excel, Numbers or Google Sheets. Text copied from a .csv file opened in a text editor does not split into columns.
- Copy the rows and paste them into the box.
- Check that the picker over each column names what the column holds. A heading row sets them for you.
- Read each row's line, such as Adds as R1 or Duplicate: already on the list. A row whose admission cohort is earlier than its year group implies also says where R1 began, such as R1 from AY 23/24, from the admission cohort. Nothing is written yet.
- Press the button that adds them. It says how many, for example Add these 12 residents. The line then reads Added 12 residents.
If this goes wrong
- Duplicate: already on the list: that name is taken. Check the resident is not already in, or make the name differ.
- Not added: that work email is someone else's: two residents cannot share an email.
- Cannot be read: not a work email: check the address.
- Cannot be read: the year group is not R0, R1, R2 or R3: write the year group as R0 to R3.
- Added the wrong person? See Remove a resident added by mistake.
More detail
- The year group you type is a check, not a setting. The planner works out each resident's year group from their postings in the Database. A resident typed R2 began R1 the year before this one; one typed R3, two years before.
- Until their past years are in, a resident typed R2 or R3 reads R1, and the row says Adds as R1 until past years are entered (typed R2).
- A resident typed R0 starts R1 next July (see Add next July's intake as R0).
- The admission cohort is the intake year. Left blank, it is the year R1 began. It decides which Curriculum version the resident follows.
- A cohort earlier than the year group implies sets where R1 began. A resident typed R2 during AY 26/27 began R1 in AY 25/26; with 2023 as their cohort, R1 began in AY 23/24, and every posting from then can be pasted. So paste everyone, then paste all their postings from R1 (see Add residents' past years).
- A resident admitted before their R1 began, with national service in between, is the exception: their intake year would set R1 too early. Type the year their R1 began. Then, before any year of theirs is entered, open their page and set their Admission cohort to the year they were admitted (see Change a resident's details).
- Add resident, one at a time, reads the cohort the same way, but its line does not say where R1 began.
- The paste reads year groups written as
1,R1,Year 1,Y1,PGY1,firstor1st year, and the same for 2 and 3; and0,R0orYear 0as R0. - One paste takes up to 2,000 rows.
Next: Add residents' past years. Try it in the demo: add one resident, then remove them.
Add residents' past years
When: at set-up, after the residents are in. About 10 minutes, once the spreadsheet is ready. You need: for each resident, every academic year since their R1 year began, this year included, twelve blocks a year.
Paste past postings, twelve blocks, then add the year
Before you start
- Add the residents first. Each row is matched to a resident by name, ignoring capitals and spacing.
- Earlier years and this year go in this way, this year's blocks still ahead as planned. A year that has not begun is refused.
- On Add residents, press Paste past postings.
- Press Download the template. The file past-postings-template.csv downloads, with an example row and the specialty codes.
- In your spreadsheet, fill in one row per resident per year, earlier years and this year: Name, Academic year, then Block 1 to Block 12.
- In each block, write the posting as specialty and hospital, such as
CVM NHC; orLeave; orLeft; or leave the block blank. - Copy the rows and paste them into the box.
- Read each row's line, such as Adds AY 25/26.
- Press the button that adds them. It says how many, for example Add these 40 years. The line then reads Added 40 years.
If this goes wrong
- Not on the list yet: paste the residents first: add that resident, then paste the row again.
- Not added: AY 27/28 has not begun: only a year that has begun goes in. Plan a coming year in a draft (see Make next year's draft).
- Not added: AY 24/25 is before R1 began: the planner has their R1 beginning later. If it began in AY 24/25, they need 2024 as their admission cohort: at set-up, before anything else of theirs is in, remove them and paste them again with it (see Remove a resident added by mistake and Add residents).
- Duplicate: AY 25/26 is already in the record: correct that year on the Database instead (see Correct a filed year).
- Not added: two residents share this name: make the two names differ.
- Cannot be read: block 7: check how that block is written.
More detail
- The academic year can be written
AY 25/26,25/26,2025/26,2025-2026or2025. - A posting can be written
CVM NHC,RES-SGHorCardiology at NHC: the specialty by code or name, the hospital by code, in either order. A specialty held at only one hospital needs no hospital. - Leave can also be written
AL,MC,ML,NPL,L,LV,on leaveorannual leave.Graduatedreads as Left. A blank or a dash means an empty block. - Each year added this way shows as Entered in the Database.
- A pasted year brings no block dates. For this year, that means today's block is read from the calendar month. To keep this year's dates in the Database, put this year in through a draft instead (see Put the running year in through a draft).
- One paste takes up to 2,000 rows.
Next: Check every resident's year group. If this year was not in the paste, first Put the running year in through a draft.
Put the running year in through a draft
When: once, at set-up, after the residents and their past years are in, if this year was not pasted with them. About 1 hour for a whole programme. You need: every resident's twelve blocks for this year, as planned, and this year's block dates.
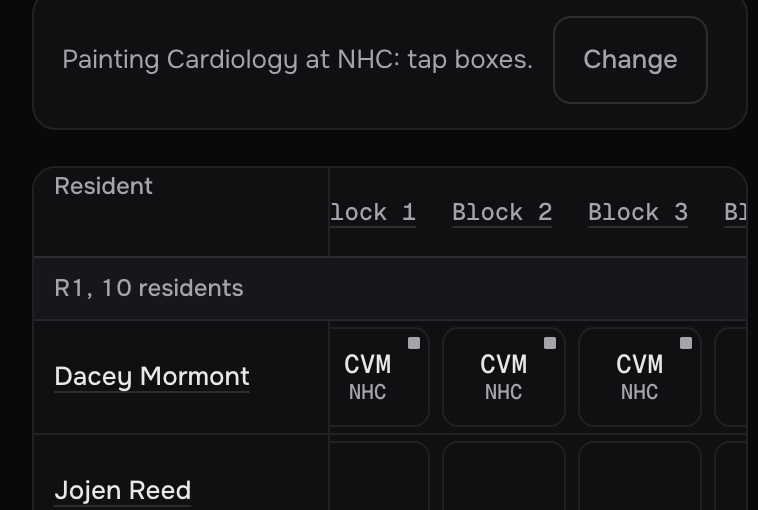
This year can also be pasted with the past years (see Add residents' past years). A draft takes longer, but it brings this year's block dates into the Database, and those decide which block is today's. You plan the year, then file it. The demo was set up the same way.
Before you start: make the draft only once the residents and their past years are all in. A draft keeps the residents and their year groups as they were when it was made.
- On Home, press Plan a new year. A new draft opens as its table, for next year, for example AY 27/28 Draft 1.
- In Academic year, pick this year, for example AY 26/27. The name follows, for example AY 26/27 Draft 1.
- Press Set the dates, set Block 1 to Block 12, then press Back (see Set the block dates).
- Press Paint, pick a department, and press every box a resident did, or will do, there. Repeat for each department, and for Leave (see Place the postings you must).
- Press Save.
- Press File in the Database. The sheet File this table in the Database? opens. Read what it will write.
Warning: the next two steps write this year into the Database. You can correct it afterwards, but no button undoes it.
- In Type FILE, type FILE.
- Press File in the Database. The line starts AY 26/27 filed: and gives the number of residents.
If this was a mistake: correct single boxes on the Database year (see Correct a filed year). Or fix the draft and file it again: filing again replaces the year.
Check every resident's year group
When: at set-up once this year is in, and before each wish round. About 5 minutes. You need: nothing.
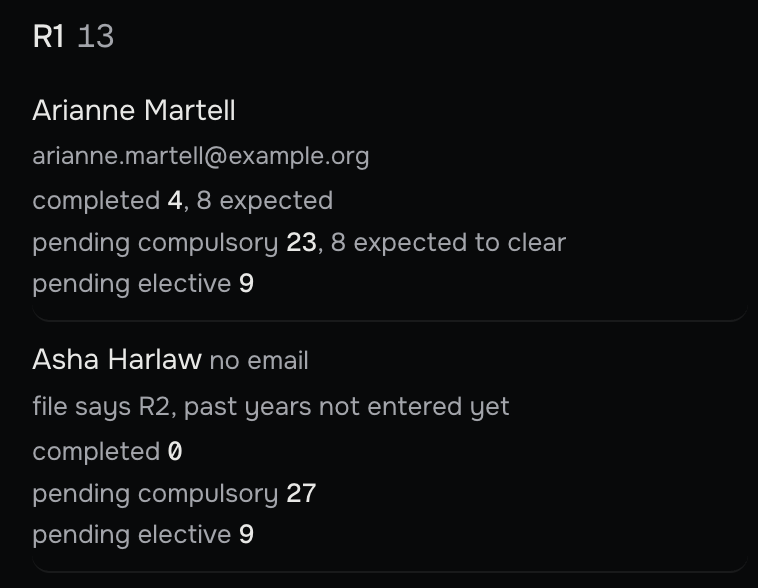
- On Home, press Residents, then Existing residents. Everyone is listed in groups: R0, R1, R2, R3, Graduated and Left. A group shows only when it has someone in it.
- Check that each resident is in the group you expect.
- Look for file says R2, past years not entered yet on the line under a name. That resident has a past year missing: paste it (see Add residents' past years).
- Look for a line such as file says R3, planner reads R2 under a name. That resident has not yet served 12 blocks of postings in their year group, often because of Leave or a posting marked Failed. Press their name to see their record.
- Look for no email. That resident will get no wish emails: add their work email (see Change a resident's details).
- To find one person, type in Find a name.
More detail
- Each row shows three figures over the whole residency: completed blocks of postings, pending compulsory blocks still owed, and pending elective blocks still owed. An expected part adds what the Database's later blocks would bring, as in completed 16, 20 expected.
- The amber tag manual marks a year group set by hand.
- A resident typed R2 or R3 reads R1 until their past years and this year are in the Database.
- How the planner works out year groups: How year groups are worked out.
Next: Add a colleague to the planner, or fix what you found with Change a resident's details.
Change a resident's details
When: whenever a name, work email or admission cohort is wrong. About 2 minutes. You need: the right details.
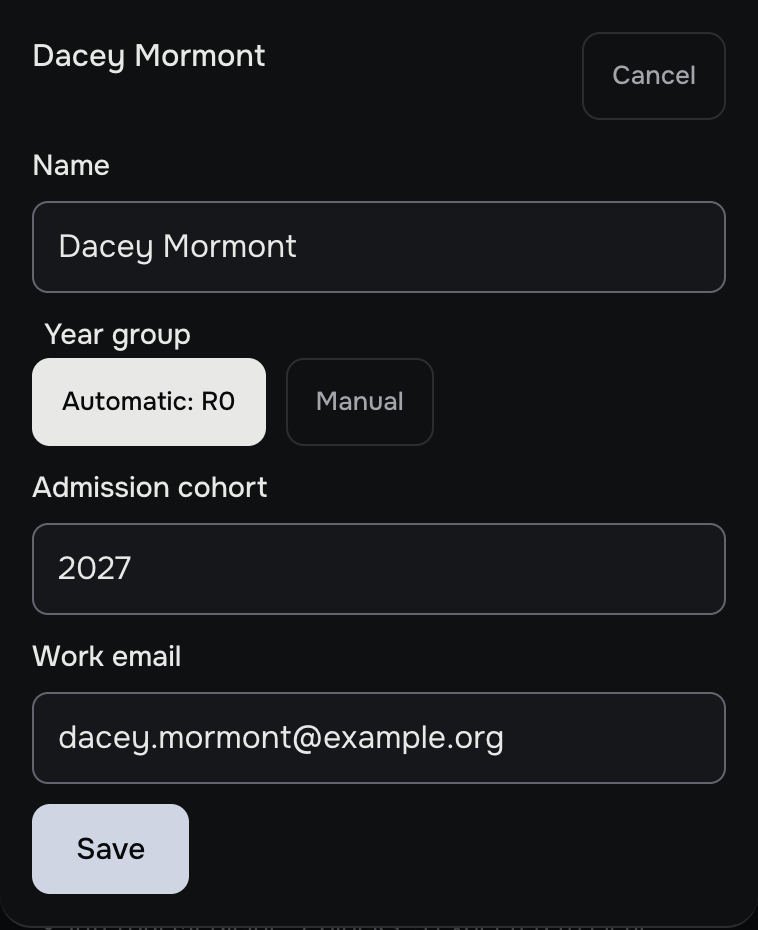
- On Home, press Residents, then Existing residents, then the resident's name. Their page opens.
- Under Who, press the pencil. A sheet opens, titled with their name.
- Change the Name, the Work email or the Admission cohort.
- Press Save. The page reads Saved.
If this goes wrong
- That work email is someone else's.: another resident has that address.
- That is not a work email.: check the address.
- The admission cohort cannot be later than the R1 start.: the cohort is the intake year, never after R1 began.
- The name and work email are saved; the rest is not.: fix the other fields and press Save again.
More detail: setting a year group by hand
Warning: a year group set by hand pins the resident from the year and block you pick. The planner stops working out their year group from then on, until you choose Automatic again. Use it only when the Database cannot show the truth.
- In the same sheet, under Year group, pick Manual.
- In Set to, pick R1, R2, R3 or Graduated.
- Pick the From year and the From block.
- Press Save. The resident shows the amber tag manual.
To hand the resident back to the planner, pick Automatic and press Save. A Graduated set by hand ends the resident's year from its block, as a Left box does.
While the Database holds no year for a resident, the sheet also shows R1 from year and R1 from block. Use them to correct when R1 begins, for example for a resident added as R0 by mistake. Once the Database holds a year for them, the start is fixed: The start cannot change once the record holds a year.
Remove a resident added by mistake
When: only for a resident added in error, such as a duplicate. About 2 minutes. You need: nothing.
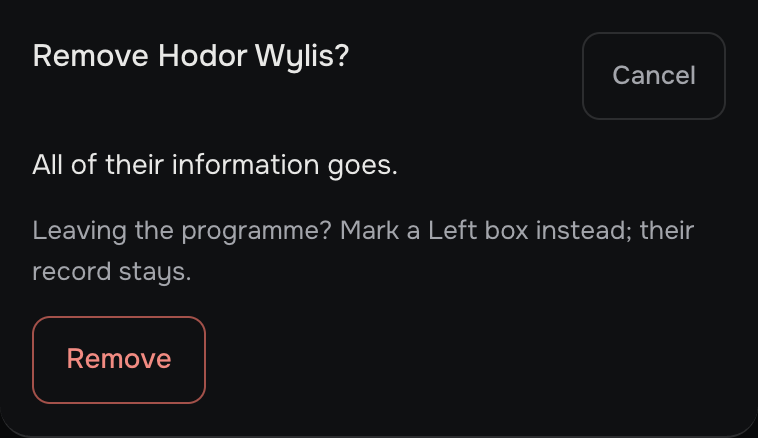
Warning: removing cannot be undone. It erases the resident, their name and email, every Database row and every wish list. For a resident who leaves the programme, mark a Left box instead (see Record a resident who leaves).
- Open the resident's page: Residents, Existing residents, then their name.
- At the very end of the page, press Remove this resident. The sheet asks Remove Hodor Wylis? and says All of their information goes. If the Database holds years for them, it names those years too.
- Press Remove. You return to Existing residents, which says Removed Hodor Wylis.
If this was a mistake: add the resident again and paste their past years again (see Add residents). Their wish lists cannot be brought back. A draft made before the removal shows them as No longer in the programme: press Duplicate on it to bring in the re-added resident.
Add a colleague to the planner
When: at set-up, and when a colleague joins. About 2 minutes. You need: their work email, or a mainstream personal email.
Picture coming
- On Home, press People. The page lists everyone on the planner, each marked Admin or Member.
- In Email, type your colleague's address.
- If you are an admin, pick the Role: Member or Admin. A member does not see this choice, and adds members only.
- Press Add. A line says the address was added. Your colleague receives an email headed You have been added, with how to sign in.
If this goes wrong
- That person is already on this project. To change their role, remove them first, then add them again with the new role.
- That does not look like an address roster.sg accepts. Check the spelling. Only work email and the common personal providers are accepted.
More detail
- Only admins can remove someone: press Remove beside their row. It takes effect at once. Nobody can remove themselves.
- Residents are never added here. A resident signs in with the work email on their record.
- People is not in the demo.
Next: Stage 2 tasks: Wish round.